Leave a comment

Block search indexing with meta tags

How to prevent your content from appearing in Google Search results.

You can prevent a page from appearing in Google Search by including a noindex meta tag in the page’s HTML code. When Googlebot next crawls that page, Googlebot will see the noindex meta tag and will drop that page entirely from Google Search results, regardless of whether other sites link to it.

Important! For the noindex meta tag to be effective, the page must not be blocked by a robots.txt file. If the page is blocked by a robots.txt file, the crawler will never see the noindex tag, and the page can still appear in search results, for example if other pages link to it.

The noindex meta standard is a useful tool if you don’t have root access to your server, as it allows you to control access to your site on a page-by-page basis.

To prevent most search engine web crawlers from indexing a page on your site, place the following meta tag into the <head> section of your page:

<meta name="robots" content="noindex">

To prevent only Google web crawlers from indexing a page:

<meta name="googlebot" content="noindex">

You should be aware that some search engine web crawlers might interpret the noindex directive differently. As a result, it is possible that your page might still appear in results from other search engines.
Leave a comment

Using PHP to Backup MySQL Databases

There are at least three ways to backup your MySQL Database :


  1. Execute a database backup query from PHP file.
  2. Run mysqldump using system() function.
  3. Use phpMyAdmin to do the backup.

Execute a database backup query from PHP file

Below is an example of using SELECT INTO OUTFILE query for creating table backup :

<?php
include ‘config.php’;
include ‘opendb.php’;

$tableName  = ‘mypet’;
$backupFile = ‘backup/mypet.sql’;
$query      = “SELECT * INTO OUTFILE ‘$backupFile’ FROM $tableName”;
$result = mysql_query($query);
include ‘closedb.php’;
?>

To restore the backup you just need to run LOAD DATA INFILE query like this :


<?php
include ‘config.php’;
include ‘opendb.php’;

$tableName  = ‘mypet’;
$backupFile = ‘mypet.sql’;
$query      = “LOAD DATA INFILE ‘backupFile’ INTO TABLE $tableName”;
$result = mysql_query($query);
include ‘closedb.php’;
?>

It’s a good idea to name the backup file as tablename.sql so you’ll know from which table the backup file is

Run mysqldump using system() function

The system() function is used to execute an external program. Because MySQL already have built in tool for creating MySQL database backup (mysqldump) let’s use it from our PHP script


<?php
include ‘config.php’;
include ‘opendb.php’;

$backupFile = $dbname . date(“Y-m-d-H-i-s”) . ‘.gz’;
$command = “mysqldump –opt -h $dbhost -u $dbuser -p $dbpass $dbname | gzip > $backupFile”;
system($command);

include ‘closedb.php’;
?>

Use phpMyAdmin to do the backup

This option as you may guessed doesn’t involve any programming on your part. However I think i mention it anyway so you know more options to backup your database.

To backup your MySQL database using phpMyAdmin click on the “export” link on phpMyAdmin main page. Choose the database you wish to backup, check the appropriate SQL options and enter the name for the backup file.

<style type=”text/css”> .style1 { width: 615px; } .style2 { text-align: right; width: 85px; } </style>
Leave a comment

Fundamentals of Web Design


Designing a web site needs careful thinking and planning.

The most important thing is to KNOW YOUR AUDIENCE.


Users are Scanners

A typical visitor will NOT read the entire content of your Web page!

No matter how much useful information you put into a Web page, a visitor will only spend a few seconds scanning it before he/she decide whether to leave or to stay.

Be sure to make your point in the very first sentence of the page! After that, try to keep the user occupied with short paragraphs, and new headers down the page.


Less is More

Keep the paragraphs as short as possible.

Keep the pages as short as possible. Continue Reading »

Leave a comment

WordPress Glossary

This document is designed to offer definitions for various terms, exclusive to WordPress, that users may not be familiar with.

If you are a contributor please don’t add definitions for generic terms (API, PHP, JavaScript, etc…).

Absolute Path

An absolute path or full path is a unique location of a file or directory name within a computer or filesystem, and usually starts with the root directory or drive letter. Directories and subdirectories listed in a path are usually separated by a slash (/).

Example: /Users/Matt/www/blog/images/icecream.jpg

To find the absolute filesystem path of the directory containing a web page, copy the code below into a new text file, save the file as path.php (thus making a simple PHP web page), and move that file to your web server. Then direct your web browser to theURL address of that file (e.g. http://www.example.com/path.php). Continue Reading »

Leave a comment

6 Cool Things You Can Do With Sticky Posts in WordPress

1. Automatically Expire Sticky Posts

2. Sticky Posts for Categories

3. Display Latest Sticky Posts

4. Sticky Posts for Custom Post Types

5. How to Hide Sticky Posts From WordPress Loop

6. Styling Sticky Posts

Full post on

http://www.wpbeginner.com/beginners-guide/6-cool-things-you-can-do-with-sticky-posts-in-wordpress/

Leave a comment

Simple Pagination with CodeIgniter Framework and Bootstrap

Introduction

Pagination is a feature that is used to restrict the display of the data that is not too long and neater. As seen in the illustration on the front of this article. Use pagination commonly used to display large amounts of data, so it can be separated / selected how the data will be shown first.

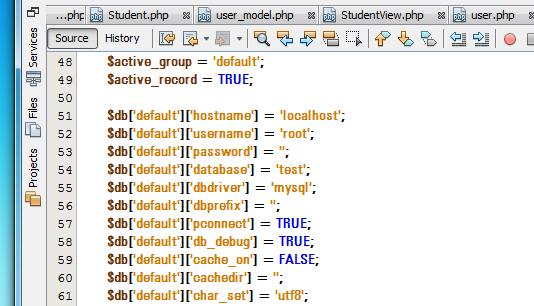
Setting Database Configuration

Open database.php within codeigniter\application\config. Set config like below:

Untitled-1 copy

Preparing Database

We will learn about showing data from database in CodeIgniter. But, before that, we prepare a database for practice. This post create a database named “ci_test” and a table named “users”. We use phpMyAdmin for easy.

  1. Open your phpmyadmin.
  2. Enter database name “student” in create new database field.
  3. Click Create button. Your database will be created.
  4. Create new table by running this query in your sql window:
 CREATE TABLE IF NOT EXISTS `users` (
 `id` int(11) NOT NULL AUTO_INCREMENT,
 `name` varchar(50) NOT NULL,
 `email` varchar(100) NOT NULL,
 `address` varchar(255) NOT NULL,
 `mobile` varchar(15) NOT NULL,
 PRIMARY KEY (`id`)
) ENGINE=InnoDB DEFAULT CHARSET=latin1 AUTO_INCREMENT=65 ;

Insert some sample data to your users table

Continue Reading »

Leave a comment

File Uploading System Using CodeIgniter

In This Tutorial I will discuss How to Make File Upload System Using PHP CodeIgniter Framework.

At Essentially in CodeIgniter to do upload file we have given her class to help us developers, and this time we will discuss the class.

Let’s discussed step by step below:

  1. Create upload_form.php file and place it in the application / views and type the following script:
1 <html>
2 <head>
3 <title>CodeIgniter Upload Form </title>
4 </head>
5 <body>
6 <?php echo $error;?>
7 <?php echo form_open_multipart('fileupload/do_upload');?>
8 <input type="file" name="userfile" size="20" />
9 <br /><br />
10 <input type="submit" value="upload" />
11 </form>
12 </body>
13 </html>

2.       Then create upload_success.php file and place it in application / views and contents of the script as follows: Continue Reading »

Leave a comment

HTML Table Class in CodeIgniter

HTML Table Class

The Table Class provides functions that enable you to auto-generate HTML tables from arrays or database result sets.

Using the Table Class

Initializing the Class

Like most other classes in CodeIgniter, the Table class is initialized in your controller using the $this->load->library()method:

$this->load->library('table');

Once loaded, the Table library object will be available using:

$this->table

Examples

Here is an example showing how you can create a table from a multi-dimensional array. Note that the first array index will become the table heading (or you can set your own headings using the set_heading() method described in the function reference below).

$this->load->library('table');

$data = array(
        array('Name', 'Color', 'Size'),
        array('Fred', 'Blue', 'Small'),
        array('Mary', 'Red', 'Large'),
        array('John', 'Green', 'Medium')
);

echo $this->table->generate($data);

Here is an example of a table created from a database query result. The table class will automatically generate the headings based on the table names (or you can set your own headings using the set_heading() method described in the class reference below).

$this->load->library('table');

$query = $this->db->query('SELECT * FROM my_table');

echo $this->table->generate($query);

Here is an example showing how you might create a table using discrete parameters:

$this->load->library('table');

$this->table->set_heading('Name', 'Color', 'Size');

$this->table->add_row('Fred', 'Blue', 'Small');
$this->table->add_row('Mary', 'Red', 'Large');
$this->table->add_row('John', 'Green', 'Medium');

echo $this->table->generate();

Here is the same example, except instead of individual parameters, arrays are used:

$this->load->library('table');

$this->table->set_heading(array('Name', 'Color', 'Size'));

$this->table->add_row(array('Fred', 'Blue', 'Small'));
$this->table->add_row(array('Mary', 'Red', 'Large'));
$this->table->add_row(array('John', 'Green', 'Medium'));

echo $this->table->generate();

Changing the Look of Your Table

The Table Class permits you to set a table template with which you can specify the design of your layout. Here is the template prototype:

$template = array(
        'table_open'            => '<table border="0" cellpadding="4" cellspacing="0">',

        'thead_open'            => '<thead>',
        'thead_close'           => '</thead>',

        'heading_row_start'     => '<tr>',
        'heading_row_end'       => '</tr>',
        'heading_cell_start'    => '<th>',
        'heading_cell_end'      => '</th>',

        'tbody_open'            => '<tbody>',
        'tbody_close'           => '</tbody>',

        'row_start'             => '<tr>',
        'row_end'               => '</tr>',
        'cell_start'            => '<td>',
        'cell_end'              => '</td>',

        'row_alt_start'         => '<tr>',
        'row_alt_end'           => '</tr>',
        'cell_alt_start'        => '<td>',
        'cell_alt_end'          => '</td>',

        'table_close'           => '</table>'
);

$this->table->set_template($template);

Note

You’ll notice there are two sets of “row” blocks in the template. These permit you to create alternating row colors or design elements that alternate with each iteration of the row data.

You are NOT required to submit a complete template. If you only need to change parts of the layout you can simply submit those elements. In this example, only the table opening tag is being changed:

$template = array(
        'table_open' => '<table border="1" cellpadding="2" cellspacing="1" class="mytable">'
);

$this->table->set_template($template);

You can also set defaults for these in a config file.

Class Reference

classCI_Table
$function = NULL
Allows you to specify a native PHP function or a valid function array object to be applied to all cell data.

$this->load->library('table');

$this->table->set_heading('Name', 'Color', 'Size');
$this->table->add_row('Fred', '<strong>Blue</strong>', 'Small');

$this->table->function = 'htmlspecialchars';
echo $this->table->generate();

In the above example, all cell data would be ran through PHP’s htmlspecialchars() function, resulting in:

<td>Fred</td><td>&lt;strong&gt;Blue&lt;/strong&gt;</td><td>Small</td>
generate([$table_data = NULL])
Parameters:
  • $table_data (mixed) – Data to populate the table rows with
Returns:

HTML table

Return type:

string

Returns a string containing the generated table. Accepts an optional parameter which can be an array or a database result object.

set_caption($caption)
Parameters:
  • $caption (string) – Table caption
Returns:

CI_Table instance (method chaining)

Return type:

CI_Table

Permits you to add a caption to the table.

$this->table->set_caption('Colors');
set_heading([$args = array()[, ]])
Parameters:
  • $args (mixed) – An array or multiple strings containing the table column titles
Returns:

CI_Table instance (method chaining)

Return type:

CI_Table

Permits you to set the table heading. You can submit an array or discrete params:

$this->table->set_heading('Name', 'Color', 'Size');

$this->table->set_heading(array('Name', 'Color', 'Size'));
add_row([$args = array()[, ]])
Parameters:
  • $args (mixed) – An array or multiple strings containing the row values
Returns:

CI_Table instance (method chaining)

Return type:

CI_Table

Permits you to add a row to your table. You can submit an array or discrete params:

$this->table->add_row('Blue', 'Red', 'Green');

$this->table->add_row(array('Blue', 'Red', 'Green'));

If you would like to set an individual cell’s tag attributes, you can use an associative array for that cell. The associative key data defines the cell’s data. Any other key => val pairs are added as key=’val’ attributes to the tag:

$cell = array('data' => 'Blue', 'class' => 'highlight', 'colspan' => 2);
$this->table->add_row($cell, 'Red', 'Green');

// generates
// <td class='highlight' colspan='2'>Blue</td><td>Red</td><td>Green</td>
make_columns([$array = array()[, $col_limit = 0]])
Parameters:
  • $array (array) – An array containing multiple rows’ data
  • $col_limit (int) – Count of columns in the table
Returns:

An array of HTML table columns

Return type:

array

This method takes a one-dimensional array as input and creates a multi-dimensional array with a depth equal to the number of columns desired. This allows a single array with many elements to be displayed in a table that has a fixed column count. Consider this example:

$list = array('one', 'two', 'three', 'four', 'five', 'six', 'seven', 'eight', 'nine', 'ten', 'eleven', 'twelve');

$new_list = $this->table->make_columns($list, 3);

$this->table->generate($new_list);

// Generates a table with this prototype

<table border="0" cellpadding="4" cellspacing="0">
<tr>
<td>one</td><td>two</td><td>three</td>
</tr><tr>
<td>four</td><td>five</td><td>six</td>
</tr><tr>
<td>seven</td><td>eight</td><td>nine</td>
</tr><tr>
<td>ten</td><td>eleven</td><td>twelve</td></tr>
</table>
set_template($template)
Parameters:
  • $template (array) – An associative array containing template values
Returns:

TRUE on success, FALSE on failure

Return type:

bool

Permits you to set your template. You can submit a full or partial template.

$template = array(
        'table_open'  => '<table border="1" cellpadding="2" cellspacing="1" class="mytable">'
);

$this->table->set_template($template);
set_empty($value)
Parameters:
  • $value (mixed) – Value to put in empty cells
Returns:

CI_Table instance (method chaining)

Return type:

CI_Table

Lets you set a default value for use in any table cells that are empty. You might, for example, set a non-breaking space:

$this->table->set_empty("&nbsp;");
clear()
Returns: CI_Table instance (method chaining)
Return type: CI_Table

Lets you clear the table heading and row data. If you need to show multiple tables with different data you should to call this method after each table has been generated to clear the previous table information. Example:

$this->load->library('table');

$this->table->set_heading('Name', 'Color', 'Size');
$this->table->add_row('Fred', 'Blue', 'Small');
$this->table->add_row('Mary', 'Red', 'Large');
$this->table->add_row('John', 'Green', 'Medium');

echo $this->table->generate();

$this->table->clear();

$this->table->set_heading('Name', 'Day', 'Delivery');
$this->table->add_row('Fred', 'Wednesday', 'Express');
$this->table->add_row('Mary', 'Monday', 'Air');
$this->table->add_row('John', 'Saturday', 'Overnight');

echo $this->table->generate();

Continue Reading »

1 Comment

Active Record Pattern SELECT and INSERT Active record in CodeIgniter

Standard Insert

$sql = "INSERT INTO mytable (title, name) 
        VALUES (".$this->db->escape($title).", ".$this->db->escape($name).")";
$this->db->query($sql);
echo $this->db->affected_rows();

Active Record Query

The Active Record Pattern gives you a simplified means of retrieving data:

$query = $this->db->get('table_name');
foreach ($query->result() as $row)
{
    echo $row->title;
}

The above get() function retrieves all the results from the supplied table. The Active Record class contains a full compliment of functions for working with data.

Active Record Insert

$data = array(
'title' => $title,
'name' => $name,
'date' => $date
);
$this->db->insert('mytable', $data);
// Produces: INSERT INTO mytable (title, name, date) VALUES ('{$title}', '{$name}', '{$date}')

2 Comments

Database Quick Start: Example Code

The following page contains example code showing how the database class is used. For complete details please read the individual pages describing each function.

Initializing the Database Class

The following code loads and initializes the database class based on your configuration settings:

$this->load->database();

Once loaded the class is ready to be used as described below.

Note: If all your pages require database access you can connect automatically.

Standard Query With Multiple Results (Object Version)

$query = $this->db->query('SELECT name, title, email FROM my_table');
foreach ($query->result() as $row)
{
    echo $row->title;
    echo $row->name;
    echo $row->email;
}
echo 'Total Results: ' . $query->num_rows();

The above result() function returns an array of objects. Example: $row->title

Standard Query With Multiple Results (Array Version)

$query = $this->db->query('SELECT name, title, email FROM my_table');
foreach ($query->result_array() as $row)
{
    echo $row['title'];
    echo $row['name'];
    echo $row['email'];
}

The above result_array() function returns an array of standard array indexes. Example: $row[‘title’]

Testing for Results

If you run queries that might not produce a result, you are encouraged to test for a result first using the num_rows() function:

$query = $this->db->query("YOUR QUERY");
if ($query->num_rows() > 0)
{
   foreach ($query->result() as $row)
   {
      echo $row->title;
      echo $row->name;
      echo $row->body;
   }
}

Standard Query With Single Result

$query = $this->db->query('SELECT name FROM my_table LIMIT 1');
$row = $query->row();
echo $row->name;

The above row() function returns an object. Example: $row->name